An XML sitemap is an important SEO file that helps search engines discover and understand the pages and posts published on your website. If you run a website on Blogger, creating and submitting an XML sitemap can make it easier for search engines such as Google to crawl your blog.
The good news is that Blogger automatically generates an XML sitemap for your website, so you do not need to create one manually from scratch.
In this guide, you will learn how to find your Blogger XML sitemap, submit it to Google Search Console, and check whether it is working correctly.
What Is an XML Sitemap?
An XML sitemap is a file that contains information about the pages, posts, and other content that search engines can discover on a website.
It provides search engines with a structured list of URLs that they can crawl.
For a Blogger website, the sitemap is automatically generated by Blogger. You generally do not need to install a plugin or upload an XML file manually.
A typical Blogger sitemap URL looks like this:
https://yourblog.blogspot.com/sitemap.xml
If you use a custom domain, it normally follows your domain name:
https://www.yourdomain.com/sitemap.xml
Replace yourdomain.com with your actual website address.
Why Is a Sitemap Important for a Blogger Website?
Although having a sitemap does not guarantee that Google will index every page, it can help search engines discover your content more efficiently.
An XML sitemap can be particularly useful when:
- Your blog has many posts.
- You publish new articles frequently.
- Your website is relatively new.
- Some pages are difficult for search engines to discover through internal links.
- You want to monitor sitemap processing through Google Search Console.
A sitemap is therefore one of the basic technical SEO elements worth setting up when building a Blogger website.
Does Blogger Automatically Create an XML Sitemap?
Yes.
Blogger automatically generates sitemap files for blogs hosted on its platform. This means you normally don’t have to create an XML sitemap manually.
For many Blogger websites, the main sitemap can be accessed by adding:
/sitemap.xml
to the end of the website address.
For example:
https://example.blogspot.com/sitemap.xml
Or, for a custom domain:
https://www.example.com/sitemap.xml
Open the address in your browser to see whether Blogger has generated the sitemap correctly.
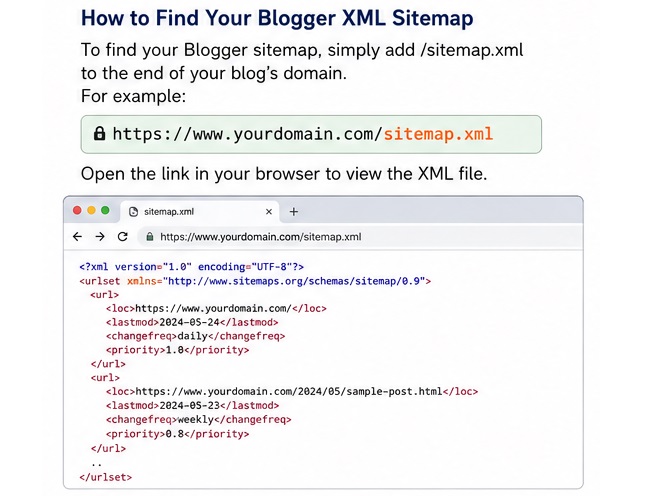
How to Find Your Blogger XML Sitemap
Finding your Blogger sitemap is simple.
Step 1: Open Your Blogger Website
First, open your Blogger website in a web browser.
For example:
https://www.example.com
Make sure you use the correct primary domain of your blog.
Step 2: Add /sitemap.xml
Click the browser’s address bar and add:
/sitemap.xml
to the end of your website address.
Your final URL should look similar to:
https://www.example.com/sitemap.xml
Press Enter.
Step 3: Check the Sitemap
If the sitemap is available, your browser should display an XML document or sitemap information containing URLs associated with your website.
You do not need to edit this file.
The important thing is to confirm that it loads successfully.
How to Submit a Blogger Sitemap to Google Search Console
After confirming that your sitemap exists, you can submit it through Google Search Console.
Google Search Console is Google’s platform for monitoring how websites appear in Google Search.
Step 1: Open Google Search Console
Sign in to your Google Search Console account and select the Blogger website you want to manage.
If you have not added the website yet, you will first need to add and verify the appropriate property.
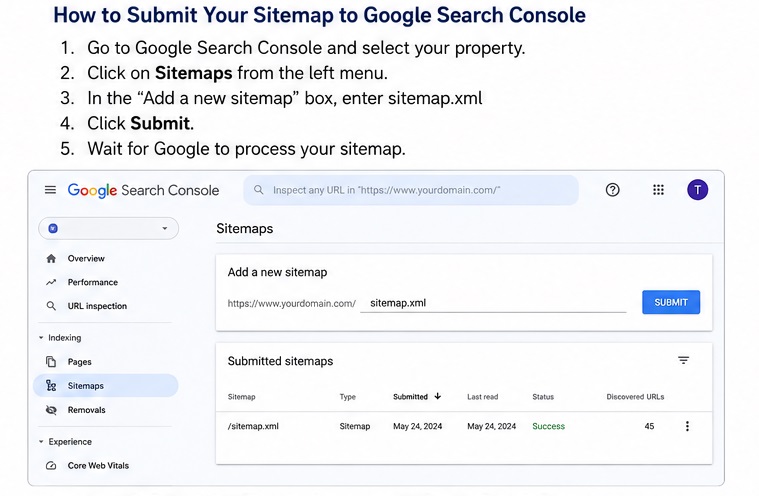
Step 2: Open the Sitemaps Section
From the Search Console dashboard, locate Sitemaps.
This section allows you to submit sitemap URLs and monitor their processing status.
Step 3: Enter the Sitemap Path
If your Blogger website is:
https://www.example.com
enter:
sitemap.xml
in the sitemap submission field.
📖 Related Reads
You generally do not need to enter the complete domain if Search Console has already selected the correct property.
Step 4: Click Submit
Click Submit and wait for Google Search Console to process the sitemap.
Google may take some time to crawl and process the URLs contained in the sitemap.
What If sitemap.xml Does Not Work?
If your sitemap does not load, check the following:
1. Check Your Website Address
Make sure you are using the correct domain.
For example:
https://www.example.com/sitemap.xml
rather than an incorrect variation of the domain.
2. Check HTTPS
If your website uses HTTPS, make sure you are using the HTTPS version of the sitemap.
For example:
https://www.example.com/sitemap.xml
3. Check Search Console Property
Make sure the website you are submitting the sitemap for matches the property selected in Google Search Console.
4. Give Google Time
A sitemap submission does not mean that every URL will immediately appear in Google Search results.
Google still decides which URLs to crawl and index based on its systems and other signals.
Blogger Sitemap vs RSS/Atom Feed
Blogger also provides feeds that can sometimes be used to help search engines discover recent content.
For example, Blogger feeds may use URLs such as:
/feeds/posts/default
However, sitemap.xml is the standard sitemap URL you should check first when setting up your Blogger website for search-engine crawling.
For a normal Blogger blog, you should not need to manually create a complicated sitemap generator.
Should You Create a Sitemap Manually?
For most Blogger websites, no.
Because Blogger automatically generates sitemap files, manually creating and uploading an XML sitemap is generally unnecessary.
Your focus should instead be on:
- Making sure the sitemap is accessible.
- Submitting it to Google Search Console.
- Creating useful and original content.
- Building a strong internal linking structure.
- Keeping your important pages accessible to search engines.
- Monitoring indexing problems in Search Console.
How to Check if Google Has Processed Your Sitemap
After submitting the sitemap, return to the Sitemaps section in Google Search Console.
You should be able to see information about the sitemap, including whether Google has successfully processed it.
If Google reports an error, check the sitemap URL and make sure your Blogger website is accessible.
You can also monitor your website’s indexing performance through the Pages or indexing reports in Search Console.
Remember that a successfully submitted sitemap does not automatically mean that all your blog posts will be indexed.
Common Blogger Sitemap Mistakes to Avoid
Submitting the Wrong URL
One of the most common mistakes is entering an incorrect sitemap address.
For a typical Blogger site, start by checking:
sitemap.xml
Creating Multiple Unnecessary Sitemaps
You generally don’t need to keep submitting different third-party sitemap files when Blogger already provides its own sitemap system.
Expecting Instant Indexing
Submitting a sitemap is not an indexing shortcut. Google still evaluates individual URLs before deciding whether and when to crawl and index them.
Ignoring Internal Links
A sitemap should complement—not replace—good website navigation and internal linking.
Make sure important articles can be reached through links from other pages on your blog.
Frequently Asked Questions
Does every Blogger website have an XML sitemap?
Blogger automatically provides sitemap functionality for its hosted blogs. You can normally test it by visiting your domain followed by /sitemap.xml.
What is the correct Blogger sitemap URL?
For most Blogger websites, the standard sitemap address is:
https://yourdomain.com/sitemap.xml
Do I need a sitemap plugin for Blogger?
No. Blogger automatically generates its sitemap, so a WordPress-style sitemap plugin is generally unnecessary.
Will submitting a sitemap guarantee Google indexing?
No. A sitemap helps Google discover URLs, but it does not guarantee that every submitted URL will be crawled or indexed.
How often should I submit my Blogger sitemap?
You normally do not need to repeatedly submit the same sitemap every time you publish an article. Once submitted successfully, Google can revisit the sitemap to discover changes.
Final Thoughts
Creating an XML sitemap for a Blogger website is much easier than it may initially seem. Blogger automatically generates the sitemap, so you usually only need to locate it and submit it to Google Search Console.
Start by visiting:
https://yourdomain.com/sitemap.xml
If the sitemap loads correctly, submit sitemap.xml through the Sitemaps section of Google Search Console.
After that, concentrate on publishing useful content, maintaining good internal links, improving your website’s technical SEO, and monitoring your indexing status.
For a Blogger website, having a working sitemap is a simple but useful part of a solid SEO setup.