If you’ve recently created a website or blog, one of the first things you should do is make sure Google can discover and index your pages.
Google Search Console is a free service from Google that helps website owners monitor their site’s presence in Google Search and troubleshoot indexing problems.
Submitting your website to Search Console doesn’t guarantee that every page will immediately appear in Google Search. However, it gives Google a way to discover your website and provides you with useful information about indexing, search performance and technical issues.
In this guide, you’ll learn how to submit your website to Google Search Console, verify ownership, submit your sitemap and request indexing for individual pages.
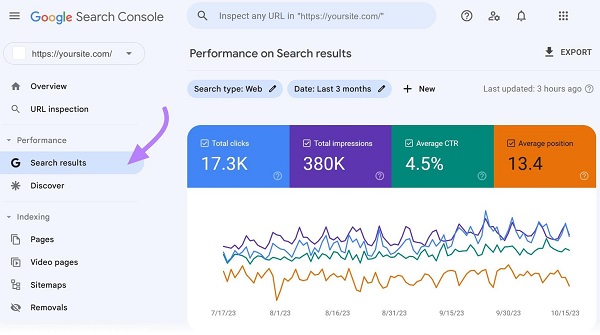
What Is Google Search Console?
Google Search Console (GSC) is a free Google service designed to help website owners, bloggers, developers and SEO professionals understand how their websites perform in Google Search.
You can use Search Console to:
- Monitor Google Search traffic
- Check which pages are indexed
- Submit sitemaps
- Request indexing
- Identify indexing problems
- See search queries that bring visitors
- Monitor clicks and impressions
- Check Core Web Vitals
- Review mobile usability and other search-related issues
- Check security and manual-action notifications
For a new website, Search Console is particularly useful because it helps you understand whether Google is discovering your content correctly.
What You Need Before Submitting Your Website
You don’t need advanced technical knowledge to set up Google Search Console.
Before starting, make sure you have:
- A working website
- Access to your website’s administration area
- A Google Account
- Permission to modify your website if verification requires it
- Your website’s correct URL
For example:
https://example.com
If your website uses HTTPS, make sure you enter the HTTPS version.
Step 1: Open Google Search Console
Go to the official Google Search Console website:
Sign in with your Google Account.
If you have never used Search Console before, you’ll be prompted to add a property.
Google provides two main property types:
Domain
A Domain property covers all protocols and subdomains associated with a domain.
For example, it can cover:
https://example.comhttp://example.comhttps://www.example.comhttps://blog.example.com
Domain verification generally requires adding a DNS record to your domain.
URL-prefix
A URL-prefix property covers URLs beginning with the specific prefix you enter.
For example:
https://example.com/
It provides several verification methods, depending on your website.
Which one should you choose?
For most website owners who want broad coverage of their domain, Domain property is a good choice.
If you’re unable to modify DNS records or you’re managing a specific site section, URL-prefix verification may be more convenient.
Step 2: Add Your Website
After signing in:
- Open Google Search Console.
- Click Add property.
- Choose Domain or URL-prefix.
- Enter your website address.
- Continue with verification.
Make sure you enter the correct domain or URL.
For example, if your website is:
https://techfalz.com
don’t accidentally enter a different version or spelling.
Step 3: Verify Website Ownership
Google needs to confirm that you actually control the website before giving you access to Search Console data and management features.
The verification method depends on the property type.
For a Domain property, Google commonly uses DNS verification.
For a URL-prefix property, Google may offer methods such as:
- HTML file upload
- HTML meta tag
- Google Analytics
- Google Tag Manager
- DNS verification
The available methods can depend on your website setup and account.
Step 4: Verify Your Website Using an HTML Meta Tag
For many bloggers and website owners, the HTML tag method is convenient.
Google provides a verification meta tag that looks similar to:
<meta name="google-site-verification" content="YOUR_VERIFICATION_CODE">You need to place this tag in the <head> section of your website.
If you’re using WordPress, your SEO plugin or theme may provide a field for Google verification.
If you’re using Blogger, Google Search Console can often be associated with the Google account that manages the site, and other verification methods may also be available.
After adding the tag, return to Search Console and click Verify.
Important
Don’t remove the verification method immediately after successful verification.
Google may periodically check that verification remains in place.
Step 5: Submit Your Sitemap
After verifying your website, the next important step is submitting your XML sitemap.
A sitemap helps search engines discover URLs that you want them to crawl.
For many websites, the sitemap is located at:
https://example.com/sitemap.xml
However, the exact sitemap URL depends on the platform.
WordPress
Many WordPress SEO plugins generate a sitemap automatically.
Common sitemap addresses may include:
https://example.com/sitemap_index.xml
Blogger
Blogger generates sitemap-related feeds that can be used for search-engine discovery. The exact setup can vary depending on the blog and configuration.
Other websites
Your website’s content management system or SEO software may generate an XML sitemap automatically.
Step 6: Add Your Sitemap to Search Console
In Google Search Console:
- Select your website.
- Open Sitemaps.
- Find the Add a new sitemap field.
- Enter your sitemap URL.
- Click Submit.
For example, if your sitemap is:
https://example.com/sitemap.xml
you may only need to enter:
sitemap.xml
Search Console should then display the sitemap submission status.
Step 7: Request Indexing for Important Pages
Submitting a sitemap doesn’t mean that every page will immediately appear in Google.
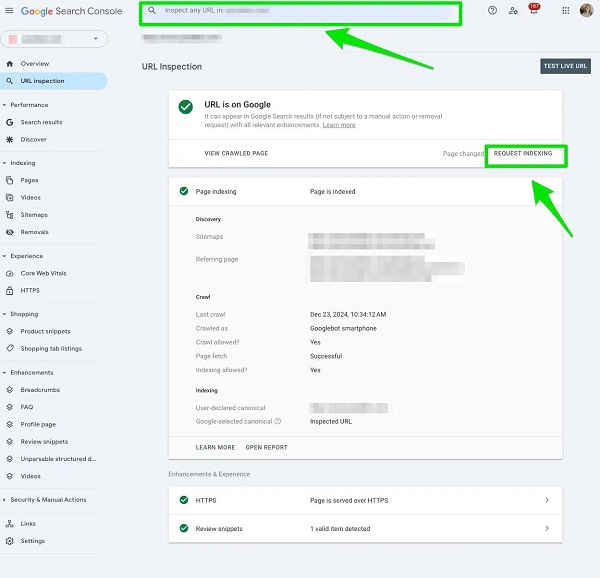
For a new or recently updated page, you can use the URL Inspection tool.
Enter the complete page URL into Search Console.
For example:
https://example.com/how-to-free-up-storage-android/
Search Console will check Google’s current information about the URL.
If the page isn’t indexed and Google allows a request, you’ll see an option such as:
Request Indexing
Click it and wait for the request to be processed.
Important
Don’t repeatedly request indexing every few minutes.
Google decides when a page is crawled and indexed. Requesting indexing is a way to signal that a URL should be considered for crawling; it isn’t a guarantee of immediate indexing or ranking.
Sitemap vs Request Indexing: What’s the Difference?
These two features are often confused by beginners.
Sitemap
A sitemap helps Google discover multiple URLs on your website.
Think of it as a map of your site’s important URLs.
Request Indexing
Request Indexing is useful when you want Google to consider a particular URL for crawling.
For example, you publish:
“10 Best Free AI Tools Students Can Use in 2026.”
You can inspect the URL and request indexing after publishing.
Best approach
For a normal website:
Submit your sitemap once → publish quality content → use URL Inspection when appropriate.
📖 Related Reads
You don’t need to manually submit every page forever.
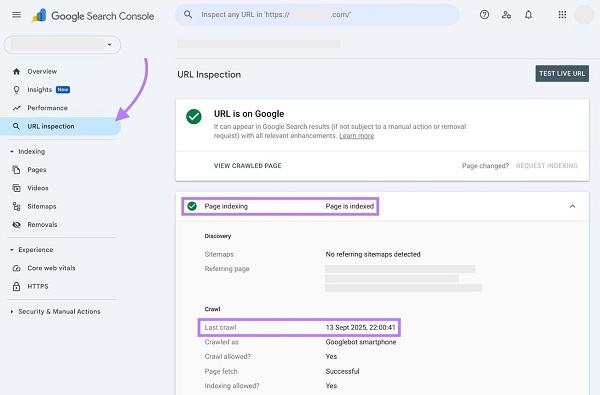
Step 8: Check Whether Your Pages Are Indexed
After submitting your website and sitemap, you can monitor indexing from Search Console.
The Pages report can show information about URLs Google has:
- Indexed
- Not indexed
- Discovered but not indexed
- Crawled but not indexed
- Excluded for other reasons
If a page isn’t indexed, don’t automatically assume that something is broken.
Google may choose not to index a page for several reasons.
Why Isn’t My Website Showing on Google?
New website owners sometimes expect their site to appear in Google immediately after submitting it.
That isn’t how search indexing works.
Google needs to:
Discover → Crawl → Process → Potentially index → Rank
These are different stages.
Submitting your website to Search Console does not guarantee that Google will index every URL.
Some reasons a page may not appear include:
- The page is very new.
- Google hasn’t crawled it yet.
- The page has technical problems.
- The page is blocked from crawling.
- The page contains a
noindexdirective. - Google considers another URL more appropriate.
- The content may not meet Google’s quality or indexing criteria.
Check Your Robots.txt File
Your robots.txt file provides crawling instructions to search engines.
It is commonly located at:
https://example.com/robots.txt
Make sure you haven’t accidentally blocked important sections of your website.
For example, a poorly configured robots.txt file can prevent search-engine crawlers from accessing content you actually want indexed.
Don’t change robots.txt settings blindly. A mistake can affect your site’s crawlability.
Check for a “Noindex” Tag
Another common reason pages don’t appear in Google is a noindex directive.
A page may contain something similar to:
<meta name="robots" content="noindex">This tells search engines not to index the page.
If you’ve intentionally set a page to noindex, that’s fine.
But if your homepage, articles or important category pages are accidentally set to noindex, you’ll want to correct the configuration.
Make Sure Your Website Is Accessible
Google needs to be able to access your website.
Check that:
- Your website loads normally.
- Important pages don’t return errors.
- Your server is online.
- HTTPS works correctly.
- Links aren’t unnecessarily broken.
- Google isn’t being blocked by your configuration.
If your website frequently goes offline, search-engine crawling can be affected.
Create Quality Content Before Expecting Search Traffic
Submitting a website to Search Console is only the beginning.
Search Console does not automatically make a website rank at the top of Google.
Your website still needs useful content that satisfies the searcher’s intent.
For example, if you’re running an education and technology website, instead of publishing dozens of extremely short articles, focus on creating genuinely useful guides.
A good article should:
- Answer the reader’s question
- Be easy to understand
- Have a logical structure
- Use accurate information
- Avoid unnecessary repetition
- Include useful examples
- Be updated when information changes
How Long Does Google Take to Index a Website?
There is no guaranteed indexing time.
A new website or page may be discovered relatively quickly, while another may take longer.
Factors that can influence discovery and crawling include:
- Website structure
- Internal links
- Sitemap availability
- Server accessibility
- Content quality
- Website history
- Number of URLs
- Crawl demand
Therefore, don’t panic if your new article doesn’t appear in Google a few hours after publication.
How to Help Google Discover New Articles
Although you can’t force Google to index a page immediately, you can make your site easier to crawl.
1. Submit your sitemap
Make sure your XML sitemap is available and submitted.
2. Use internal links
Link new articles from relevant existing articles.
For example, an article about Android storage could link to an article about transferring WhatsApp to a new phone where relevant.
3. Keep your site structure organised
Use clear categories and navigation.
4. Avoid orphan pages
An orphan page is a page with few or no internal links pointing to it.
5. Keep important content accessible
Don’t bury your most useful articles several layers deep in your site structure.
Common Google Search Console Mistakes to Avoid
Mistake 1: Adding the wrong URL
Be careful with:
http://
versus:
https://
and:
www.example.com
versus:
example.com
Mistake 2: Submitting the wrong sitemap
Make sure the sitemap actually exists before submitting it.
Mistake 3: Requesting indexing repeatedly
One request doesn’t guarantee immediate indexing. Repeatedly clicking the request button isn’t a shortcut around Google’s systems.
Mistake 4: Ignoring indexing errors
If Search Console reports a serious indexing problem, investigate it rather than simply requesting indexing again.
Mistake 5: Expecting Search Console to improve rankings automatically
Search Console is primarily a monitoring and management tool. It doesn’t guarantee rankings.
Google Search Console for New Bloggers
If you’re starting a new blog, you don’t need to become an SEO expert immediately.
Start with these basic tasks:
Day 1
- Create your Google Search Console property.
- Verify ownership.
- Submit your sitemap.
- Inspect your homepage.
After publishing articles
- Make sure the article is accessible.
- Add relevant internal links.
- Inspect the URL when appropriate.
- Request indexing if necessary.
Every few weeks
Review:
- Search performance
- Indexed pages
- Indexing problems
- Search queries
- Clicks
- Impressions
- Core Web Vitals
This gives you a useful overview of how Google is interacting with your website.
Frequently Asked Questions
Is Google Search Console free?
Yes. Google Search Console is a free service provided by Google for website owners and administrators.
Do I have to submit my website to Google Search Console?
You don’t necessarily have to manually submit a website for Google to discover it. However, setting up Search Console is strongly recommended because it gives you valuable information about your site’s indexing and Google Search performance.
Does submitting my website guarantee Google indexing?
No. Submitting a website or requesting indexing does not guarantee that Google will index a particular page.
How do I submit my sitemap to Google?
Open Google Search Console, select your website, go to Sitemaps, enter your sitemap URL and submit it.
How do I request indexing for a new page?
Use the URL Inspection tool in Google Search Console. Enter the page URL and, if available, select Request Indexing.
How long does it take Google to index a new website?
There is no fixed timeframe. Google’s crawling and indexing systems determine when pages are processed.
Can I submit every article manually?
You can use URL Inspection for individual URLs, but you generally don’t need to manually submit every article. A properly configured sitemap helps Google discover your site’s URLs.
Why is my website not appearing on Google after submitting it?
Possible reasons include the site being new, Google not having crawled it yet, technical problems, noindex directives, crawling restrictions or Google choosing not to index a particular page.
Final Thoughts
Submitting your website to Google Search Console is one of the first steps every new blogger and website owner should take.
The process is relatively simple:
Add your website → Verify ownership → Submit your sitemap → Inspect important URLs → Monitor indexing.
However, remember that Search Console isn’t an instant ranking tool. Getting your website into Google Search is a process that involves crawling, indexing and ultimately earning visibility through useful, relevant content.
For a new education or technology website, focus on publishing genuinely helpful articles, building a clear internal-link structure and monitoring Search Console regularly.
Once you’ve completed the initial setup, you can use Search Console not just to submit URLs but also to discover what people are searching for, which pages attract clicks and where your website can improve.