If you own a website or blog, setting it up on Google Search Console is one of the most important steps you can take to improve your visibility on Google Search. Whether you run a WordPress website, a Blogger blog, or an educational website, Google Search Console helps you understand how Google discovers, crawls, and indexes your content.
However, adding your website to Search Console is only part of the process. You also need to verify ownership, locate the correct sitemap, submit it properly, and monitor any indexing issues that may prevent your pages from appearing in search results.
In this beginner-friendly guide, TechFalz explains how to set up Google Search Console, submit your sitemap, troubleshoot common errors, and confirm that Google can discover your website.
What Is Google Search Console?
Google Search Console is a free service from Google that helps website owners monitor their site’s performance in Google Search and identify technical issues that may affect search visibility.
It provides information about search queries, impressions, clicks, indexing, sitemaps, mobile usability-related issues where reported, and other search-related signals.
With Google Search Console, you can:
-
Check whether Google has discovered your website pages.
-
Submit an XML sitemap to help Google discover URLs.
-
Identify indexing errors and excluded pages.
-
Monitor clicks, impressions, and average search position.
-
Inspect individual URLs to see Google’s indexing information.
-
Receive notifications about certain problems affecting your website.
Important: Google Search Console does not guarantee that every submitted URL will be indexed or appear at the top of search results. Google decides which pages to crawl, index, and rank based on its systems and applicable policies.
What Is a Sitemap, and Why Does Your Website Need One?
A sitemap is a file that lists the URLs you want search engines to discover. For most websites, an XML sitemap is the standard format used to provide information about important pages and, where appropriate, their last modification dates.
For example, a sitemap may contain URLs for your homepage, articles, pages, and other indexable content.
Submitting a sitemap can help Google discover your website’s URLs, particularly when your site is new or has many pages. It does not force Google to crawl or index every URL listed.
A sitemap is different from your website’s robots.txt file. A sitemap lists URLs you want search engines to discover, while robots.txt provides crawling rules for compliant crawlers. Neither file can guarantee indexing.
Step 1: Open Google Search Console
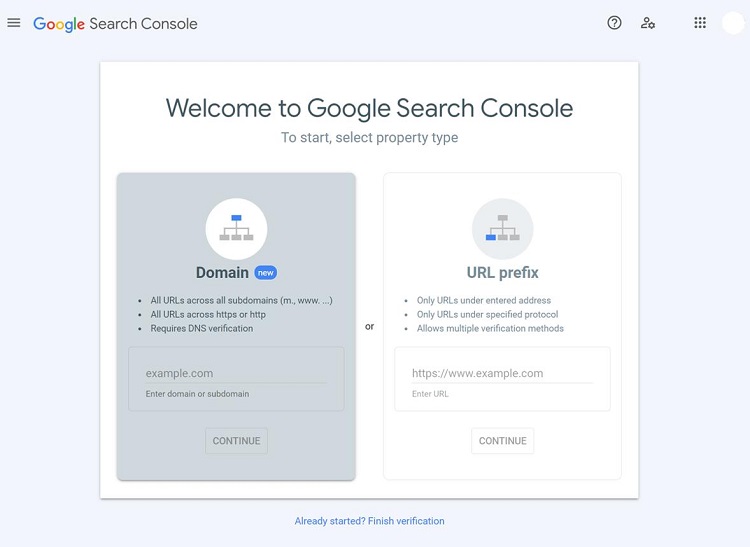
To get started, visit the official Google Search Console website.
Official website: https://search.google.com/search-console/
Sign in using the Google account you want to use to manage your website.
If you have multiple Google accounts, choose one you can access reliably. For a business website, consider using an account managed according to your organisation’s access and security policies.
After signing in, you can add a website as a property. If your website is already listed in Search Console, select it instead of creating a duplicate property unnecessarily.
Step 2: Add Your Website as a Property
Google Search Console offers two main property types: Domain and URL prefix.
- Domain property
Covers the domain and its subdomains, including both HTTP and HTTPS versions. Verification generally requires a DNS record.
- URL-prefix property
Covers only the exact URL prefix you enter, including its protocol and any specified path. It offers several verification methods.
For example, if your website is https://example.com, a Domain property uses example.com, while a URL-prefix property uses https://example.com/.
If your website is TechFalz.com, you can add techfalz.com as a Domain property to cover the domain’s subdomains and protocols, or add the exact preferred URL prefix.
Choose your property type, enter the website details, and continue to the verification stage.
Step 3: Verify Ownership of Your Website
Before you can fully manage a property in Google Search Console, you must verify that you control it.
The verification method depends on the property type you selected.
Option A: Verify a Domain Property Using DNS
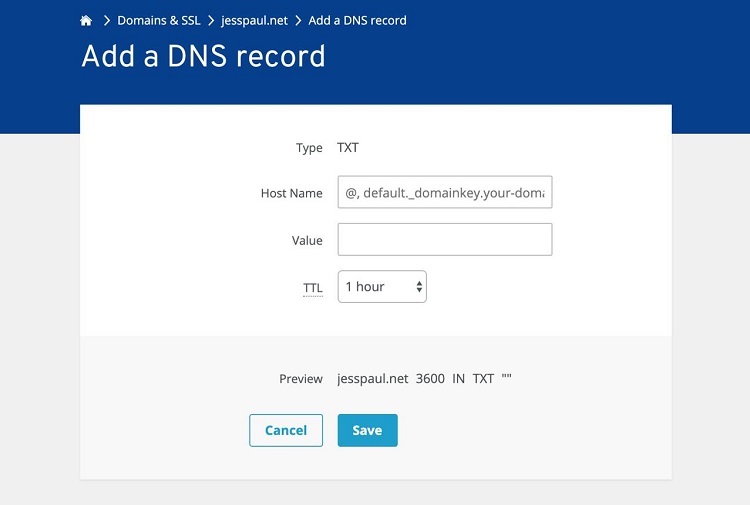
This method verifies the entire domain property, including its subdomains and protocols.
Follow these steps:
-
Add your domain, such as
techfalz.com, as a Domain property. -
Google will provide a DNS TXT record for verification.
-
Sign in to the service managing your domain’s DNS records. This may be your domain registrar or DNS hosting provider.
-
Open the DNS management section.
-
Create a new TXT record and enter the exact value supplied by Google.
-
Save the record and return to Search Console.
-
Click Verify.
DNS changes may take some time to become visible. If verification fails immediately, wait and try again rather than repeatedly creating new records.
Important: Do not delete the verification TXT record after successful verification unless you have confirmed that another valid verification method is in place.
Option B: Verify a URL-Prefix Property
If you selected a URL-prefix property, Google may offer methods such as an HTML file upload, an HTML meta tag, Google Analytics, Google Tag Manager, or DNS verification, depending on your circumstances.
For a WordPress website, an HTML meta tag may be convenient if your SEO plugin provides a verification field.
The general process is:
-
Select the HTML tag method in Search Console.
-
Copy the verification meta tag provided by Google.
-
Add it to the appropriate verification field in your SEO plugin or website configuration.
-
Save the changes and ensure the tag is present on the required page.
-
Return to Search Console and click Verify.
If you use a plugin, enter the verification value in the specific field it requests. Some plugins require the entire meta tag, while others require only its content value.
Do not copy an example verification code from another website. Use the unique code generated for your property.
Step 4: Find Your Website’s XML Sitemap
Before submitting a sitemap, confirm that it exists and opens correctly in your browser.
The correct sitemap URL depends on your platform and SEO configuration.
WordPress with Yoast SEO
Common sitemap index URL
https://example.com/sitemap_index.xml
Yoast can generate a sitemap index containing separate sitemaps for posts, pages, and other eligible content.
WordPress default sitemap
Common URL when using WordPress core sitemap
https://example.com/wp-sitemap.xml
WordPress has built-in sitemap functionality. Your actual sitemap may instead be generated by an SEO plugin.
Blogger
Common sitemap URL
https://example.blogspot.com/sitemap.xml
For a custom domain, replace the example address with your actual Blogger domain. Confirm that the sitemap loads and includes your published content.
📖 Related Reads
Replace example.com with your real domain before testing any of these URLs.
How to check whether your sitemap works
-
Open a new browser tab.
-
Enter the appropriate sitemap URL for your website.
-
Press Enter.
-
Check whether the page displays XML content or a sitemap index listing other sitemap files.
-
If it is a sitemap index, open the individual sitemap links to confirm they load.
A sitemap does not have to look like a normal website page. It may display structured XML text or a formatted list of URLs.
If you receive a 404 error, a server error, a blank response, or an HTML page unrelated to the sitemap, investigate the URL and your site’s configuration before submitting it.
For TechFalz: If you use Yoast SEO, start by checking https://techfalz.com/sitemap_index.xml. If you use another plugin or WordPress’s default sitemap, check the URL generated by that system instead. Do not assume that every WordPress website uses the same sitemap address.
Step 5: Submit Your Sitemap to Google Search Console
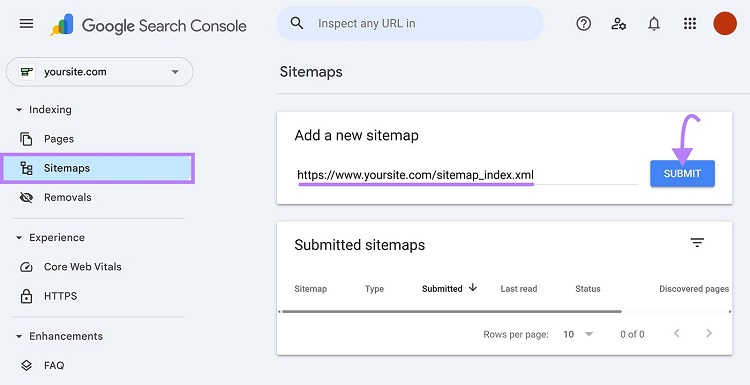
Once your sitemap is working, submit it to Google Search Console.
Follow these steps:
-
Open Google Search Console.
-
Select your verified website property.
-
Find Sitemaps in the left-hand navigation menu.
-
Locate the field labelled Add a new sitemap.
-
Enter the sitemap path, such as
sitemap_index.xmlorwp-sitemap.xml, as appropriate. -
Click Submit.
-
Review the submission status shown in the Sitemaps report.
Google’s official documentation explains that the Sitemaps report helps you see when Google accesses a sitemap and whether it encounters processing errors.
Example of a correct submission
If your verified property is https://techfalz.com/ and the working sitemap is https://techfalz.com/sitemap_index.xml, the sitemap path to submit is:
sitemap_index.xml
Enter the path without the extra spaces shown above.
If Search Console already displays your website’s domain next to the input field, you generally only need to enter the remaining path.
Do not submit a sitemap URL that belongs to a different domain or a different website property.
Step 6: Understand the Sitemap Submission Status
After submitting your sitemap, Search Console displays a status that helps you understand what happened.
- Success
Google was able to fetch and process the sitemap. This does not mean that every URL inside it has been indexed.
- Pending
Google may not have completed processing the sitemap. Allow time for the report to update.
- Couldn’t fetch
Google could not retrieve the sitemap successfully. Check the URL, server response, redirects, access restrictions, and any temporary hosting problems.
- Sitemap could not be read or contains errors
The sitemap may be malformed, empty, inaccessible, or contain URLs or XML structures that Google cannot process correctly.
The precise status wording may vary. Open the sitemap report’s details to see the specific error and recommended action.
Step 7: Check Whether Google Has Indexed Your Pages
Submitting a sitemap is not the same as getting your pages indexed. After submission, inspect important URLs individually.
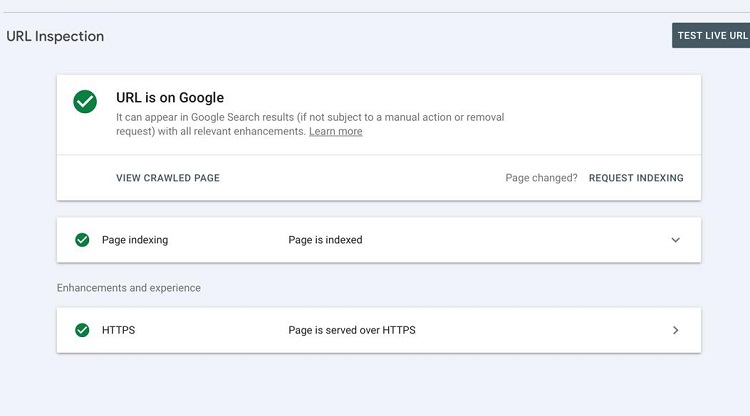
How to use URL Inspection
-
Open your website property in Search Console.
-
Copy the complete URL of a published article or page.
-
Paste it into the URL Inspection bar at the top.
-
Wait for Google to retrieve the available information.
-
Review the indexing status and any reported issues.
If the page is not indexed but is eligible for indexing, you may be able to click Request Indexing.
This asks Google to consider crawling the page. It does not guarantee immediate crawling or indexing, and repeated requests for the same URL will not make the process faster.
Prioritise important pages, including your homepage, key category pages, and recently published articles that you want Google to discover.
Step 8: Fix Common Sitemap and Indexing Problems
If your sitemap has been submitted but your pages are not appearing in Google Search, use this troubleshooting guide.
| Problem | What to check |
|---|---|
| Sitemap URL returns 404 | Confirm the sitemap path and that your sitemap generator is enabled. |
| Couldn’t fetch | Check hosting availability, server responses, redirects, and access restrictions. |
| Sitemap is empty | Check whether the website has published, eligible content and whether the sitemap generator is working. |
| URLs use the wrong domain | Make sure sitemap URLs use the correct hostname and protocol. |
Pages are excluded by noindex |
Remove the directive only if those pages should be indexed. |
| Pages are blocked by robots.txt | Review the rules and allow crawling where appropriate. |
| Discovered – currently not indexed | Review content quality, internal links, duplication, and whether Google has chosen to index the page. |
| Crawled – currently not indexed | Check the page’s usefulness, uniqueness, canonical URL, and technical accessibility. |
Google’s documentation on sitemap errors provides additional guidance for issues such as empty sitemaps, incorrect URL formats, and file-size limitations.
Avoid these common mistakes
Submitting the wrong sitemap: Do not automatically submit sitemap.xml if your SEO plugin generates sitemap_index.xml.
Submitting the same sitemap repeatedly: One correct sitemap submission is generally enough. Fix errors and resubmit when needed.
Including pages that should not be indexed: Private pages, error pages, and pages marked noindex generally should not be included in your sitemap.
Assuming a successful submission guarantees rankings: Sitemap submission supports discovery. It does not replace helpful content, sound technical SEO, or relevant internal links.
Changing URLs without updating your site: Keep your canonical URLs, internal links, redirects, and sitemap consistent after changing your domain or permalink structure.
Step 9: Monitor Search Performance Regularly
After setting up Search Console, make it part of your normal website maintenance routine.
Check the following reports:
-
Performance: Monitor search clicks, impressions, click-through rate, and average position.
-
Indexing: Review which pages are indexed and investigate significant exclusions.
-
Sitemaps: Check whether Google can retrieve and process your submitted sitemap.
-
URL Inspection: Investigate individual articles that are important but not indexed.
-
Manual Actions and Security Issues: Check these reports if you suspect a search policy or security problem.
For a new website, review the reports periodically rather than expecting meaningful data immediately. Reporting delays and limited initial search visibility are normal.
As you publish more content, monitor whether Google discovers your new URLs and whether important technical problems recur.
Step 10: A Practical Checklist for WordPress and Blogger Websites
Use this checklist to confirm that you have completed the essential setup steps.
Search Console setup checklist
[ ] Verify website ownership successfully
[ ] Find and open the correct XML sitemap
[ ] Submit the sitemap to the matching property
[ ] Confirm Google can fetch and process the sitemap
[ ] Inspect important published URLs
[ ] Check for accidental noindex directives or crawl restrictions
[ ] Review indexing and performance reports periodically
Final Thoughts
Google Search Console is an essential tool for monitoring your website’s search visibility and identifying technical problems. Setting it up correctly, verifying ownership, and submitting a working XML sitemap gives Google a useful starting point for discovering your content.
For WordPress websites, confirm which sitemap your SEO plugin generates. For Blogger websites, test the sitemap URL before submitting it. In both cases, monitor the Sitemaps report and use URL Inspection to investigate important pages that are not indexed.
Remember that a successful sitemap submission does not guarantee indexing or higher rankings. Your website also needs accessible pages, useful original content, sensible internal links, and consistent technical SEO.