Windows 11 comes with several powerful features that can make everyday computer use faster, easier and more productive. However, many users only interact with the basic functions of the operating system without exploring some of the useful tools Microsoft has included.
Beyond the familiar Start menu, File Explorer and taskbar, Windows 11 offers features for multitasking, productivity, security, file management and personalisation. Some of these tools are built directly into the operating system, meaning you do not need to download additional applications to use them.
Whether you use your computer for office work, online business, studying, programming or everyday browsing, learning about these hidden Windows 11 features can help you get more out of your PC.
In this guide, TechFalz explores some lesser-known Windows 11 features, explains what they do and shows you how to activate and use them.
1. Clipboard History: Access Previously Copied Text and Images
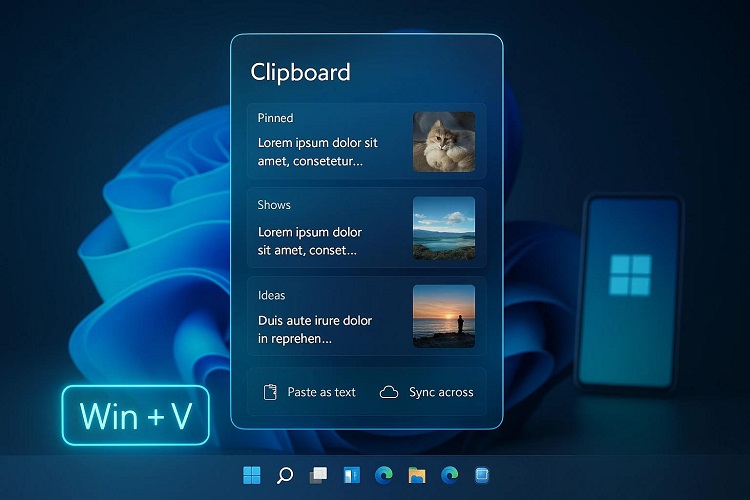
Most computer users know how to copy and paste using Ctrl + C and Ctrl + V. However, Windows 11 includes a clipboard history feature that allows you to access multiple items you have copied instead of keeping only the most recent one.
This is particularly useful when preparing documents, writing articles, handling spreadsheets or transferring information between different applications.
How to activate Clipboard History:
-
Press Windows + V on your keyboard.
-
If clipboard history is disabled, select Turn on.
-
Copy text, images or other supported content as usual.
-
Press Windows + V again to view your copied items.
-
Select any item to paste it into your current application.
You can also pin frequently used clipboard items so they remain available after restarting your computer.
Why it is useful: It saves time when you need to reuse several copied items without repeatedly switching between applications.
Privacy tip: Clipboard history may contain sensitive information. Avoid storing passwords, banking details or other confidential data in it.
2. Snap Layouts: Arrange Multiple Windows Automatically
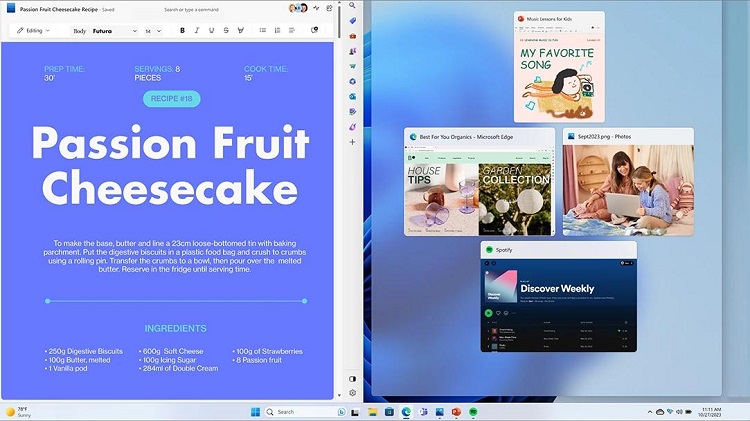
Windows 11 includes Snap Layouts, a multitasking feature that helps users organise multiple open applications on their screens.
Instead of manually resizing every window, you can choose from predefined layouts that arrange applications side by side or in different sections of your display.
For example, you can place your browser on one side of the screen, Microsoft Word on the other and a messaging application in another section.
How to use Snap Layouts:
-
Open the applications you want to use.
-
Move your mouse pointer over the maximise button in an application window.
-
Select your preferred layout.
-
Choose where you want the application to appear.
-
Assign your other open applications to the remaining spaces.
You can also press Windows + Z to open Snap Layouts directly.
Why it is useful: It makes multitasking easier, especially for students, office workers, researchers and content creators who regularly work with several applications.
3. Focus Sessions: Reduce Distractions While Working
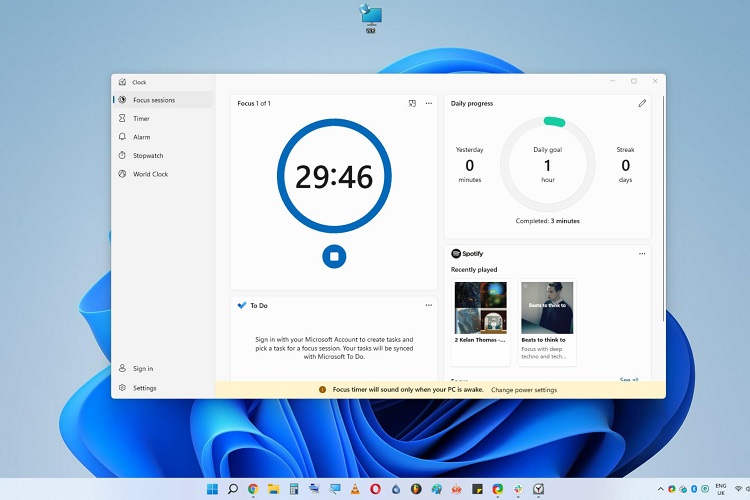
If you regularly get distracted by notifications while working or studying, Windows 11 has a Focus Sessions feature that can help you concentrate.
The feature is available through the Clock application and allows you to set a dedicated period for completing tasks without unnecessary interruptions.
Depending on your configuration and Windows version, Focus Sessions can also work with Do Not Disturb settings and Microsoft To Do.
How to start a Focus Session:
-
Open the Start menu.
-
Search for Clock and launch the application.
-
Select Focus sessions.
-
Choose how long you want to concentrate.
-
Start your session.
You can also configure breaks and other focus preferences.
Why it is useful: It helps you manage your time, reduce interruptions and maintain concentration when completing important tasks.
4. Dynamic Lock: Automatically Lock Your Computer When You Walk Away
Leaving your computer unlocked when stepping away from your desk can expose your personal files and information to other people.
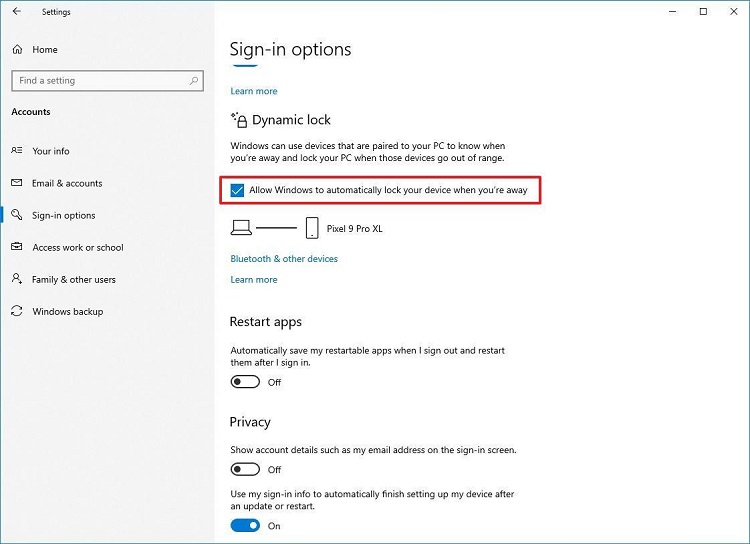
Windows 11 includes a feature called Dynamic Lock that can automatically lock your PC when a paired Bluetooth device, such as your smartphone, moves out of Bluetooth range.
How to enable Dynamic Lock:
-
Ensure Bluetooth is enabled on your computer and smartphone.
-
Pair your smartphone with your Windows 11 PC.
-
Open Settings.
-
Select Accounts.
-
Go to Sign-in options.
-
Expand Dynamic Lock.
-
Enable the option that allows Windows to automatically lock your device when you are away.
Once activated, Windows monitors the Bluetooth connection to your paired device and attempts to lock the computer when the device moves out of range.
Why it is useful: It provides an additional layer of protection when you frequently leave your workstation unattended.
Keep in mind that Dynamic Lock may take some time to lock your computer and should not replace manually locking your PC with Windows + L.
5. Virtual Desktops: Create Separate Workspaces on One Computer
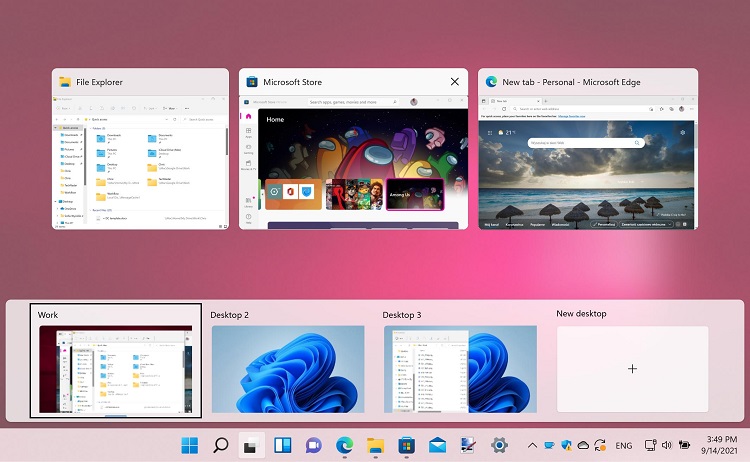
Did you know you can create multiple desktops on a single Windows 11 computer?
Virtual Desktops allow you to separate different activities without closing your applications. For instance, you can create one desktop for office work, another for personal activities and a third for studying or research.
Each desktop can have its own arrangement of open application windows.
How to create a Virtual Desktop:
-
Press Windows + Tab to open Task View.
-
Select New desktop.
-
Open the applications you want to use on that desktop.
-
Repeat the process to create additional desktops.
-
Use Windows + Ctrl + Left Arrow or Right Arrow to switch between desktops.
You can also rename desktops and assign different backgrounds to help distinguish them.
Why it is useful: It helps keep your workspace organised, particularly when you use one computer for both professional and personal activities.
6. Nearby Sharing: Transfer Files Between Windows Computers Without a Flash Drive
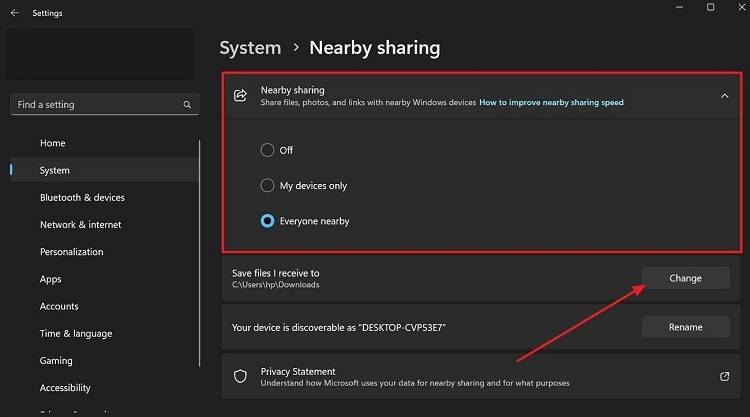
Windows 11 includes a file-sharing feature called Nearby Sharing that allows you to transfer documents, photographs and other supported files between compatible Windows computers.
This means you do not always need a USB flash drive, external storage device or third-party file-sharing application to transfer files between nearby PCs.
Depending on the devices and network configuration, Nearby Sharing uses Bluetooth or Wi-Fi.
How to enable Nearby Sharing:
-
Open Settings.
-
Select System.
-
Click Nearby sharing.
-
Choose whether to share with your own devices or everyone nearby.
-
Enable the feature on both computers.
To share a file, right-click the file, select Share and choose the nearby Windows computer you want to send it to.
The receiving computer will need to accept the transfer where required.
Why it is useful: Students, office workers and professionals can quickly exchange files between compatible computers without relying on external storage devices.
7. Storage Sense: Automatically Free Up Disk Space
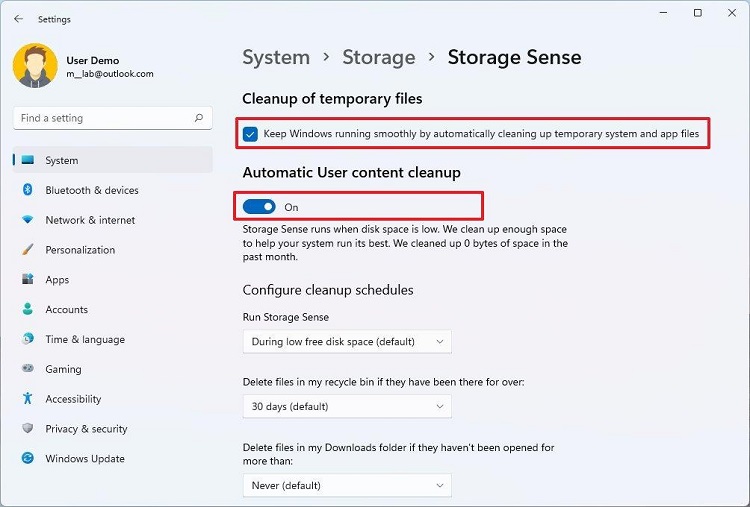
If your computer frequently runs out of storage space, Windows 11 has a built-in tool that can help manage unnecessary files.
Storage Sense automatically removes selected temporary files and other items that are no longer needed, helping you maintain available disk space.
Depending on your configuration, it can clean temporary system files and remove items from the Recycle Bin after a specified period.
How to enable Storage Sense:
-
Open Settings.
-
Select System.
-
Click Storage.
-
Locate Storage Sense.
📖 Related Reads
-
Switch it on.
-
Open its settings to customise how frequently it runs and which files it can remove.
You can also configure how long files remain in the Recycle Bin before automatic deletion.
Why it is useful: It reduces the need to manually search for unnecessary files whenever your computer’s storage becomes full.
Be careful when configuring automatic cleanup, especially if you regularly keep important files in your Downloads folder.
8. Voice Typing: Type Documents Using Your Voice
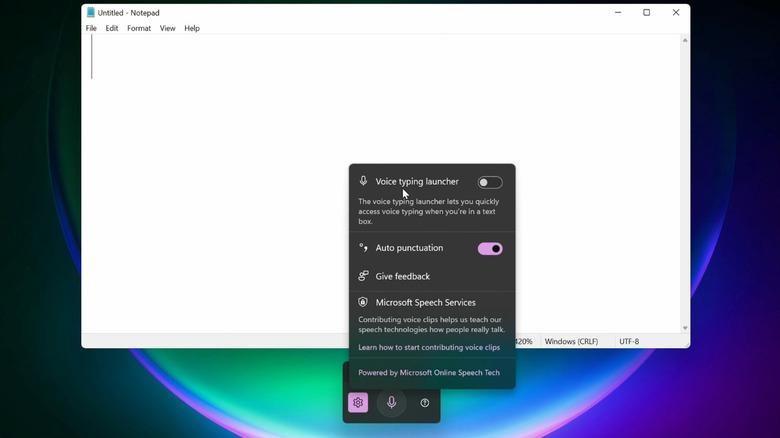
Another useful Windows 11 feature that many users overlook is Voice Typing.
This tool allows you to dictate words instead of typing them manually. It can be particularly helpful when writing long documents, preparing notes or responding to messages.
How to use Voice Typing:
-
Open Microsoft Word, Notepad or another application with a text field.
-
Click where you want the text to appear.
-
Press Windows + H.
-
Allow microphone access if requested.
-
Select the microphone button and start speaking.
Windows will convert your spoken words into text.
You can also enable automatic punctuation in the voice typing settings, although recognition accuracy may depend on your microphone, language settings and speaking conditions.
Why it is useful: It can save time when preparing lengthy documents and provides an alternative input method for people who find typing difficult.
9. Emoji, GIFs and Special Symbols: Access Them With One Shortcut
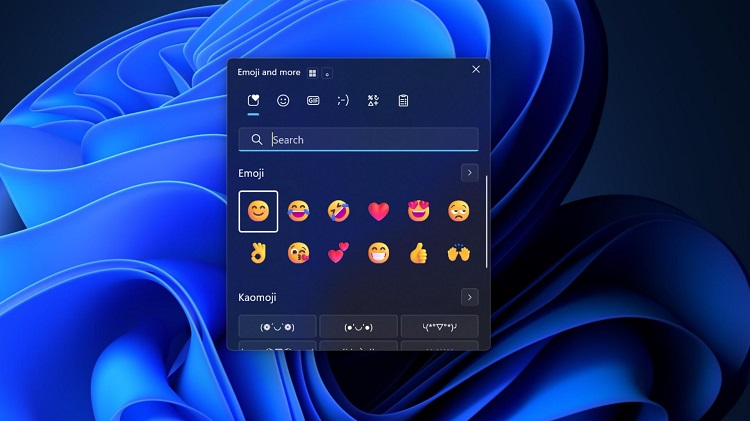
Many people install additional applications just to access emojis, GIFs and special characters. However, Windows 11 already includes a built-in panel for these items.
The panel provides access to emojis, animated GIFs, kaomoji, symbols and clipboard history.
How to open the panel:
-
Open a text editor or messaging application.
-
Place your cursor where you want to insert a character.
-
Press Windows + . (period).
-
Browse the available categories.
-
Select the emoji, GIF or symbol you want to insert.
This feature works in many applications that support text input.
Why it is useful: It makes writing messages, creating social media content and adding special characters to documents more convenient.
10. Title Bar Window Shake: Quickly Minimise Other Windows
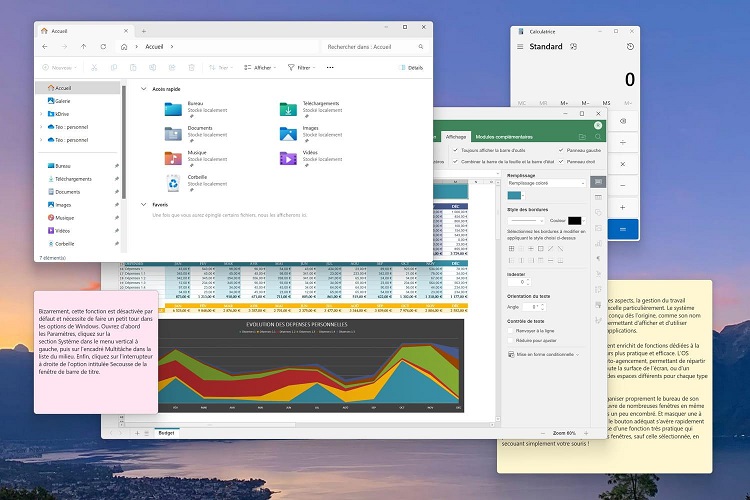
If you frequently work with several open windows, you may find this feature particularly useful.
Windows 11 includes an option called Title Bar Window Shake, which allows you to minimise other open windows by shaking the title bar of the application you want to keep active.
Instead of minimising applications one after another, you can quickly clear your desktop while keeping the selected window open.
How to enable Title Bar Window Shake:
-
Open Settings.
-
Select System.
-
Click Multitasking.
-
Find the Title bar window shake option.
-
Switch it on.
Once enabled, click and hold the title bar of the application you want to keep, then shake it with your mouse.
The other windows will minimise. Shake the active window again to restore them.
Why it is useful: It provides a quick way to clear desktop clutter when you need to concentrate on one application.
11. Night Light: Reduce Blue Light From Your Display
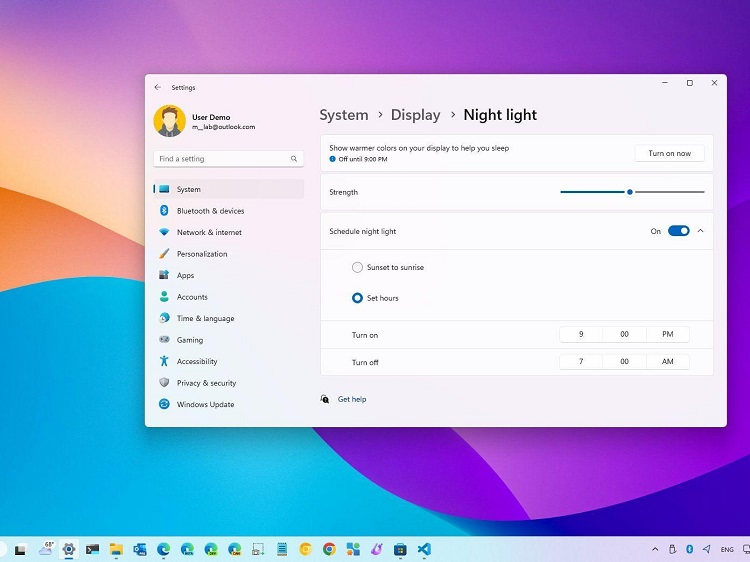
Working on a computer late at night can make the bright appearance of your screen uncomfortable.
Windows 11 includes Night Light, a display feature that changes your screen colours towards warmer tones to reduce the amount of blue light emitted by the display.
You can activate it manually or schedule it to turn on automatically at specific times.
How to enable Night Light:
-
Open Settings.
-
Select System.
-
Click Display.
-
Locate Night Light.
-
Switch it on.
-
Open its settings to adjust the strength and schedule.
You can configure Night Light to activate automatically from sunset to sunrise or according to a custom schedule.
Why it is useful: It makes the screen appear warmer during evening use and allows you to customise your display for nighttime working.
12. Quick Settings: Control Important Features From One Place
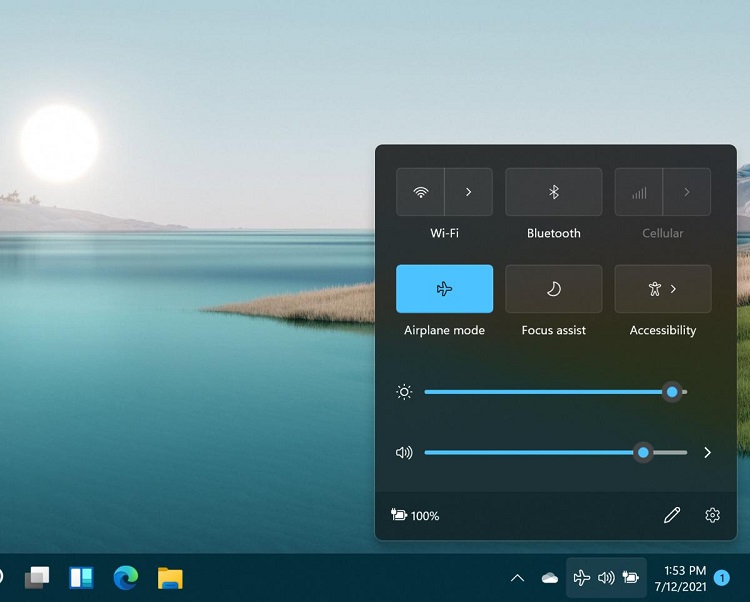
Windows 11 has a Quick Settings panel that provides convenient access to frequently used computer controls.
Instead of navigating through several Settings pages, you can quickly manage features such as Wi-Fi, Bluetooth, Airplane Mode, battery saver, screen brightness and volume.
How to open Quick Settings:
-
Press Windows + A.
-
The Quick Settings panel will appear.
-
Select the feature you want to enable or disable.
-
Use the brightness and volume sliders where available.
-
Select the edit option to customise supported controls.
The available options may differ depending on your computer’s hardware and configuration.
Why it is useful: It saves time when you frequently switch between wireless connections, adjust display brightness or manage sound settings.
13. Snipping Tool: Extract Text From Screenshots
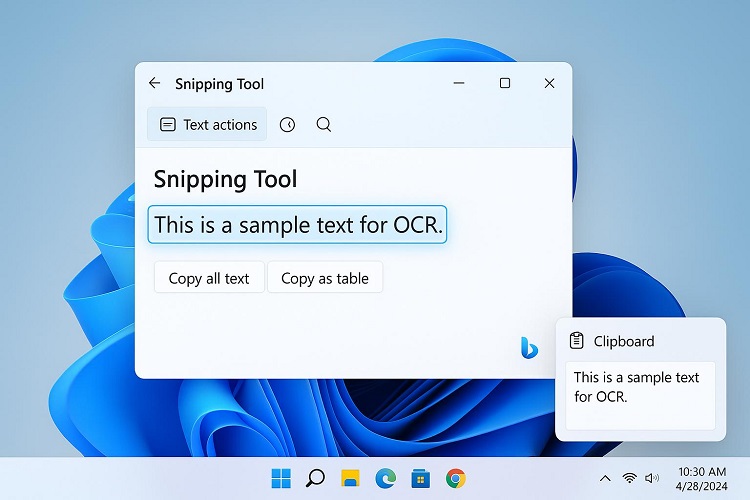
The Windows 11 Snipping Tool is commonly used to capture screenshots, but newer versions also offer text extraction capabilities on supported devices and app versions.
This means you can capture an image containing written information and extract the visible text without manually typing everything again.
The feature is particularly useful when working with screenshots, scanned documents, website images or other visual materials.
How to extract text using Snipping Tool:
-
Open the image containing the text.
-
Press Windows + Shift + S to capture the required area, or open Snipping Tool.
-
Open the screenshot in Snipping Tool.
-
Select Text Actions if the option is available.
-
Choose Copy all text or select the specific text you need.
Text recognition availability may depend on your Snipping Tool version and Windows updates.
Why it is useful: It can save time when extracting information from screenshots instead of manually rewriting everything.
How to Get the Best Out of These Windows 11 Features
Knowing these features is only the first step. To make your computer more productive, consider combining several of them in your daily activities.
For example, you can use Snap Layouts and Virtual Desktops to organise your work, Clipboard History to manage copied information, Voice Typing to prepare documents and Storage Sense to keep your computer’s storage under control.
You should also keep Windows 11 updated because Microsoft regularly introduces improvements, changes feature availability and updates the Settings interface. Some features may differ depending on your Windows edition, hardware and installed updates.
Final Thoughts
Windows 11 offers much more than the basic features most computer users interact with every day. Tools such as Clipboard History, Dynamic Lock, Nearby Sharing, Snap Layouts and Storage Sense can make everyday computing significantly more convenient.
You do not necessarily need to install additional software to improve your productivity. Sometimes, exploring the features already available in Windows is enough to transform how you use your computer.
If you have not explored these tools before, try activating a few of them and see how they improve your everyday computing experience.